Tuesday, December 21, 2010

Super Double Chocolate Chip Cookies


These cookies were probably the chocolatiest thing I'd ever put in my mouth, and that's saying something.  By my rough estimate, they're about 75% chocolate.  I made a double batch for two work Christmas parties, so if my pictures seem like they have extra, that's why.  All in all, these are an easy crowd pleaser, but be sure to have milk ready!

Preheat oven to 350 degrees.  In a double boiler, put 1 cup chocolate chips with butter, stirring often until just melted.


While chocolate is melting, put eggs, brown sugar and vanilla in a large mixing bowl. 


By this time, the chocolate should be mostly melted.  Remove from heat and stir until smooth. 


Beat eggs, brown sugar, and vanilla on high speed until light and fluffy.


Reduce speed to low; beat in melted chocolate.


Mix in flour mixture until just combined. Stir in chocolate chunks


This is what your 'dough' should look like once the chips are in.  It should be really thick and sticky.  I did my mixing on my oven while it was pre-heating, which was a mistake since it made the dough thinner and runnier than it should have been a resulted in a pan of huge, thin cookies.  If your dough seems too runny to make good cookies, let it sit on a cool counter for 10-12 minutes before putting it on the pan.


Drop heaping tablespoons of dough 2 to 3 inches apart onto baking sheets. Bake, rotating sheets halfway through, until cookies are shiny and crackly yet soft in centers, 12 to 15 minutes.  Allow to cool a minute or two on the pan, but then remove with a metal spatula.

 
Super Double Chocolate Chip Cookies

Makes 2 dozen
  • 1 cup semisweet chocolate chips/chunks
  • 4 tablespoons unsalted butter
  • 2/3 cup all-purpose flour, spooned and leveled
  • 1/2 teaspoon baking powder
  • 1/2 teaspoon salt
  • 2 large eggs
  • 3/4 cup packed light-brown sugar
  • 1 teaspoon vanilla extract
  • 1 package (350 grams) semisweet chocolate chunks

adapted from: Martha Stewart Cooking

Wednesday, December 15, 2010

Turtle Cookie Cups


Since I've been making things that were a bit complicated lately, and since Christmas is a busy busy time, I figured I would make something simple, but still delicious. These are also really cool to make and unlike anything I had ever seen before, which makes them extra sweet and really interesting for the people who eat them.  It also gave me a desire to make tarts, even though I've never baked anything with a pie crust before.  The closest I've come was my Cherry Pie Squares, but even those ended up more like cake.  Don't worry though, these are delicious and easy even if you suffer from the same pie-crust-phobia that I do.


The cookie dough for the shells has to be made first. The original recipe called for pre-made Betty Crocker dough but I prefer to make my own, so I found another simple recipe and used that.  Preheat oven to 375 degrees F  In a small bowl, stir together flour, baking soda, and baking powder. Set aside.

In a large bowl, cream together the butter and sugar until smooth. Beat in egg and vanilla. Gradually blend in the dry ingredients. 


Roll  dough into balls, and place a chunk of dough slightly bigger than a goflball in each muffin hole.  Push down to thin out the bottom and push up the sides of the tin.  For the mini muffin tin, use less dough but try to get the same, tart-like shape. This picture is of the mini-muffin tin, but you can get an idea of what it's supposed to look like.


Bake 8-9  minutes at 375 or until edges just start to brown.  Using the end of a wooden spoon, push down the middle puffy part to form a cup.  In this picture the top four cookie shells have been pressed down, so you can see the difference from unpressed ones.  Bake for another 2-3 minutes.   Let shells cool for 30 minutes or so so they can firm up before adding the filling.


Place unwrapped caramels in a double boiler with cream.  Allow them to melt, stirring occasionally.


While caramels are melting, put chocolate chips in the bottom of the cups.  You can really put as much as you want here, but I filled them from half to one third full of chocolate. 


Using two spoons, one for spooning and one for scraping, fill each cup almost to the top with the caramel sauce.  This will melt the chocolate underneath.  Add 1-2 pecans on top of each cup for decoration (and deliciousness) and you're done!

Turtle Cookie Cups

Makes about 20 big turtle cups or 40 mini ones

Sugar Cookie Dough

2 3/4 cups all-purpose flour
1 teaspoon baking soda
1/2 teaspoon baking powder
1 cup butter, softened
1 1/2 cups white sugar
1 egg
1 teaspoon vanilla extract
Filling

3/4 cup semi-sweet chocolate chips
2 (14 ounce) bags caramels, unwrapped
1/3 cup whipping cream
1/2 cup chopped pecans

Saturday, December 11, 2010

Oreo Cream Cheese Truffles


These truffles are the most low effort, low cost, high impact dessert I've personally ever encountered.  Even though they have to spend a couple hours in the freezer, they only have three ingredients and are incredibly easy to make.   The sprinkles fancy things up a bit, but you could easily cover these in peanuts, candy or even drizzle them with more white chocolate.


Put entire box of Oreos into a bowl and crush into dust.   Try not to leave any chunks, as they'll result in chunks in your truffles. 


If you're lucky like me, you can use your food processor to grind the cookies into dusty chunks. 


Add cream cheese to crushed Oreos.  Make sure the cream is softened or mixing it in will be MUCH more difficult. 


Using electric mixer, mix cream cheese and Oreo crumbs until completely blended into a smooth, sticky mass.  If you're having problems, use the mixer to get you started but then mash it together using your hands.   Once well mixed, form into small balls approximately 2-3cm across.  Put balls in the freezer for 1-2 hours or until hard and frozen.


Melt chocolate chips in a double boiler.  Once chocolate is smooth, remove from heat and dip each ball, covering it completely.  It's easiest to use two forks for maximum coverage.  Put finished balls on a baking sheet covered in tin foil.  Add any sprinkles or decorations you wish.

Oreo Cream Cheese Truffles

- 1 box Oreo cookies
- 1 8oz package of cream cheese, softened
- 700 grams chocolate chips 

Wednesday, December 8, 2010

Banana Toffee Cream Pie


From what I can tell this is pretty similar to a 'traditional' banana cream pie, except with the addition of toffee chocolate bits on top (an AWESOME idea I can unfortunately not take credit for) and the use of sweetened condensed milk to create a caramel filling.  I think I'm starting to realize, if a recipe has sweetened condensed milk in it, it's a good bet it's going to be delicious.  This pie, while pretty simple to make, does take a little while, due to having to bake the caramel filling for an hour or so, as well as having to let it cool before applying the whip cream.


Preheat oven to 350 degrees F. Combine crushed graham crackers, granulated sugar and melted butter; mix well. Firmly press crumb mixture evenly over the bottom and sides of a 9-inch pie plate.  I used a spring form pan instead of a pie plate, since I thought I had one but I must have left it somewhere.  I was originally going to use a 9" cake pan, but I'm glad I didn't, since this ended up being a very deep pie and I don't think the cake pan could have handled it. Bake crust at 350 degrees F for 7-9 minutes. Remove pie plate from oven and allow crust to cool.


Preheat oven to 425 degrees F. Pour sweetened condensed milk into another 9-inch pie plate. Cover entire pie plate including top in aluminum foil.  Using a jelly roll pan or broiler pan, fill pan with about 1/4-inch of water, then set foil-wrapped pie plate in center of pan (to create a water bath) and place in a preheated 425 degree F oven.
  Check on it ever half hour or so to see if you need to add more water.


Bake for approximately 1 hour and 20-30 minutes, or until condensed milk is thick and caramel colored and looks something like this. When done, remove pan from oven, remove foil from pie plate, and set aside to cool slightly. 


While the carmel filling is cooling, slice the bananas into thin slices and layer over crust.   Thin slices work best, approximately 1/8". 


Evenly pour or gently spread caramelized milk over bananas. Cool at least 30 minutes, up to 1 hour. Try to get it evenly over the pie when you're pouring it, it gets kind of hard to spread around once the bananas are mixed in. 


Using an electric mixer, beat heavy whipping cream until foamy; gradually add powdered sugar, beating until soft peaks form. Spread whipped cream over caramel layer. Top with a generous sprinkling of caramel chocolate bits.  I used a chocolate bar with toffee bits already embedded in it, but you could probably use any combination of the two. Carefully wrap the pie with plastic wrap (so as not to smash the pie) and place in the refrigerator to chill at least 3 hours before serving.

Banana Toffee Cream Pie

  • 1 (approximately 5 ounce) packet graham crackers, crushed (about 1 & 2/3 cups in total)
  • 1/4 granulated sugar
  • 1/4 cup plus 2 tablespoons unsalted butter, melted
  • 1 (14 ounce) can sweetened condensed milk
  • 3 ripe bananas
  • 1 cup heavy whipping cream
  • 1/4 cup sifted powdered sugar
  • 2/3 cup chocolate with toffee in it, or any other toffee-chocolate food you wish.
adapted from: A Bloggable Life

Thursday, December 2, 2010

Gingerbread Cheesecake


Just in time for Christmas and continuing my exploration of dessert flavours I haven't used before, we have this rich, delicious gingerbread cake.  When I first read the recipe, it seemed really complicated, but don't worry, it's not.  The tricky part to this cake was that it calls for baking it in a broiler pan full of water, but as I've learned, following the recipe directions, not matter how complex, means things will usually turn out.  

The crust of this cake is gingersnap crumbs, which I liked, but might be a bit too gingery for some.  The rest of the cake is good even for those who are on the fence about gingerbread, but if it's not your favorite thing, you can switch the gingersnaps to graham crackers.  The top of the cake is also pretty open to interpretation - I crushed up Skor bars and put them around the edges, but I think it would also be super cute to bake and decorate a gingerbread man or two and put them on top for a more festive, Christmas-y cake. 


Heat oven to 300°F. Combine crushed gingersnaps and butter listed in crust ingredients in a medium bowl. 


Press crust into a 9" springform pan.  The original recipe called for it to be pressed up the sides, but I prefer just a crust on the bottom so I did that.  It's up to you!


Beat cream cheese, sugar, and brown sugar until smooth, scraping down the sides of the bowl often.  This will be difficult and chunky, and your mixer will get clogged with cream cheese a lot.  Just do your best to get a decent mix going and make sure your cream cheese is softened and not straight out of the fridge.  If you forgot to take it out, just put it all in the bowl and microwave it on 10 second intervals until it's soft. 


Add eggs one at time, beating after each addition.  This will smooth out your mixture and make it much, MUCH easier to beat together. 


Add remaining filling ingredients and beat until smooth and well mixed.  This shouldn't take long, just enough to achieve a nice, smooth brown colour. 


Pour the filling into the crust, then wrap the springform pan in a sheet of aluminum foil.  I used two pieces, shiny side out, one going in each direction for maximum coverage.  I'm not 100% sure what the point of the foil was, but probably something to do with putting the cake in water. 


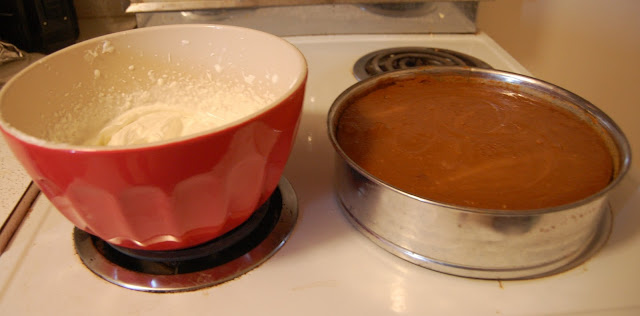
Place the cake in the broiler pan and fill it with hot water until the water reaches halfway up the cake.  Place the cake in the pre-heated oven.  Bake 1 hour 15 minutes to 1 hour 25 minutes or until edges are puffed and top is dry to the touch. Center should move slightly when pan is tapped but should not ripple as if liquid. Turn the oven off and allow cheesecake to cool until you can take it out without using oven mitts.


The cake will have darkened significantly.  Allow to further cool, covered by a dishcloth, on your countertop until room temperature. Cover the top with plastic wrap and chill for at least 6 hours -- overnight is best.


Beat whipping cream and powdered sugar in large bowl at medium-high speed until soft peaks form. Beat in rum, if using, until firm but not stiff peaks form.


Spread whipped cream all over the top of the cake.  You may have some extra - I slapped it all on there but ended up with an edge of whip cream that sort of hung over the edge of the cake itself.  I didn't mind, but if you do, just be careful to keep the whip cream closer to the center of the cake, or take the top of the springform pan off before you do it. 


Apply Skor bits or other decorations to the top of the cake, and voila! You're done. 


Gingerbread Cheesecake

2 cups finely ground gingersnaps
4 tablespoons unsalted butter, melted
4 (8-oz.) pkgs cream cheese, softened
1/2 c. packed light brown sugar
1/2 c. sugar
4 eggs
1/2 c. sour cream
1/2 c. molasses
2 tsp ground ginger
1 tsp ground cinnamon
1/2 tsp ground cloves

Topping:
1 cup heavy whipping cream
1/2 cup powdered sugar
1 tablespoon rum or 1/8 tsp rum extract (optional)

4 Skor bars, crushed

adapted from:  Perry's Plate

Thursday, November 25, 2010

Almond Walnut Cookies


These cookies were continuation of my attempt to branch out from traditional dessert flavours.  Yes, I know that they're cookies and dipped in chocolate, but they have walnuts!  Which, while still fairly dessert-y, was a new thing for me.  I also haven't baked cookies in AGES, sometime that's totally strange for me, considering my childhood specialty was cookies of the peanut butter chocolate chip variety. 

The original recipe said these were to make four dozen cookies, two teaspoons of dough each, but I ended up with about twenty good sized cookies.  It original recipe also called to bake them on parchment paper, which I didn't have, so I reduced the heat and upped the cooking time to stop the bottoms from burning.  If you ever have any problems with burnt-bottom cookies, though, the best solution is to let them cool, then run the bottoms over a cheese grater a few times.  This will grate off the black, bad tasting burnt part and leave you with just delicious, delicious cookie.


Preheat oven to 325. 


In a large bowl, sift together the flour, baking powder and salt. Using an electric mixer, beat together the butter, brown sugar and vanilla until pale and fluffy.  This took me a LONG time and was very stressful. Light and fluffy? What did that mean? Oh god, what if I beat it too long? In the end it ended up taking me about ten minutes, and I beat it until it achieved a consistency like thick whipping cream.  Don't forget to scrape down the sides so you don't waste any dough.


Add the flour mixture at low speed, then stir in the walnuts.  After this, I realized the beater wasn't doing the dough any favours in terms of getting it to stick together, so once everything was mixed I used my hands to form it into a big ball.


Grease a baking sheet and form the dough into egg-shapes.  You could definitely fit more onto a pan than I have here, they don't spread at all. Bake for about 7 minutes then check them, then bake in 3-4 minute intervals until set.  It's a really dry dough so they don't need much, just enough so the top is set and the bottom is lightly browned. If in doubt, take them out, I would say. They'll firm up as they cool.


Melt the chocolate in a double boiler until smooth.  Remove from heat and dip half of each cookie, one cooled,  into the chocolate.  Place on a tinfoil or parchment paper lined baking sheet.  Sprinkle walnuts over the chocolate covered half of the cookie.  Place cookies in the fridge to allow chocolate to set, around 15 minutes.

Almond Walnut Cookies

  • 2 cups all-purpose flour
  • 1/2 teaspoon baking powder
  • 1/4 teaspoon salt
  • 2 sticks (1 cup) unsalted butter, melted and cooled
  • 3/4 cup packed light brown sugar
  • 1 teaspoon vanilla
  • 1 cup finely chopped walnuts (4 ounces)
For Decoration:
  • 8 ounces semisweet chocolate, melted
  • 1/2 cup finely chopped walnuts (2 ounces)

Adapted from:  Erza Pound Cake

Wednesday, November 17, 2010

Pineapple Cake

Pineapple caaaaaaaake! I've been trying to branch out from the traditional dessert flavors of chocolate, peanut butter and cheesecake (NOT that there's anything wrong with any of those!) and this cake was the result.  I was kind of skeptical at first but the icing really made the cake - it ended up gooey delicious because of the holes poked in it before the icing is applied. I know it seems like a lot of liquid to pour on a hot cake, but trust me, it's worth it.


Preheat oven to 350. Grease 9x13 pan.

Combine flour, sugar, baking powder, baking soda and salt. Add eggs, pineapple and vanilla. Beat at medium speed until combined.


Pour batter into prepared pan and bake for 30 min or until a toothpick inserted in the center comes out clean.


In a saucepan, combine icing ingredients Bring to boil over med heat; boil for 2 min, stirring constantly. Remove from heat.


Poke 1/2-in holes in the cake with the end of a mixing spoon at 1-in intervals. Pour icing over hot cake. Sprinkle with chopped pecans and coconut. 


Pineapple Cake

2 c flour
2 c sugar
1 tsp baking powder
1 tsp baking soda
1/8 tsp salt
2 eggs
2 8-oz cans crushed pineapple, undrained
1 tsp vanilla extract
Coconut icing
1 c chopped pecans
1 c sweetened flake coconut

Icing:
1 c butter
1 5-oz can evap milk
1 1/2 c sugar
1 tsp vanilla

adapted from:  Perry's Plate